Battery switch on travel trailer function is crucial for managing your RV’s power. Understanding how these switches work, from their different types to their installation and maintenance, is key to avoiding dead batteries and electrical issues. This guide breaks down everything you need to know about maximizing your travel trailer’s power system, ensuring smooth and safe journeys.
We’ll cover the various types of battery switches – single-pole, double-pole, and double-pole double-throw – explaining their pros and cons and how to choose the right one for your needs. We’ll also delve into the wiring, installation, and troubleshooting of these switches, providing clear diagrams and step-by-step instructions to empower you to handle any electrical challenges on the road.
Types of Battery Switches in Travel Trailers
Choosing the right battery switch for your travel trailer is crucial for managing your power system efficiently and safely. Different types of switches offer varying levels of control and protection, impacting both convenience and the lifespan of your batteries. Understanding these differences will help you make an informed decision.
Battery switches in travel trailers primarily control the flow of power from your batteries to the various electrical components in your RV. They act as a central hub, allowing you to isolate specific battery banks or disconnect them completely for safety or maintenance. The choice of switch depends on the complexity of your setup and your power needs.
Single-Pole Battery Switches
Single-pole switches are the simplest type, controlling only one circuit. They’re ideal for smaller travel trailers with a single battery or for situations where you only need to switch power on or off to a single battery bank. These switches are usually less expensive but lack the flexibility of more complex options. A common drawback is that they don’t offer isolation between batteries, potentially leading to issues if one battery is faulty.
Double-Pole Battery Switches, Battery switch on travel trailer function
Double-pole switches offer more control than single-pole switches, managing two circuits simultaneously. This allows you to switch power on or off for two separate battery banks independently. This added control is beneficial in trailers with dual battery systems (e.g., one for house functions and one for starting the tow vehicle). However, they still don’t provide complete isolation between the batteries.
Double-Pole Double-Throw (DPDT) Battery Switches
DPDT switches are the most versatile option. They offer the ability to switch between two sources, often connecting to either shore power or one of two battery banks. This allows for seamless switching between sources, providing redundancy and maximizing power flexibility. This is the preferred choice for RVers who frequently use both shore power and batteries. They also allow for more advanced battery management strategies.
However, they are typically the most expensive.
Comparison of Battery Switch Types
| Switch Type | Number of Batteries Controlled | Isolation Capability | Price Range | Typical Applications |
|---|---|---|---|---|
| Single-Pole | 1 | None | $10 – $30 | Small trailers with a single battery |
| Double-Pole | 2 | None | $20 – $50 | Trailers with separate house and starting batteries |
| Double-Pole Double-Throw (DPDT) | 2 (selectable) | Partial (between sources, not necessarily between batteries within a source) | $40 – $100+ | Trailers needing to switch between shore power and multiple battery banks |
Function and Purpose of Battery Switches: Battery Switch On Travel Trailer Function
A battery switch in your travel trailer is essentially the control center for your trailer’s power system. It’s a crucial component that allows you to manage power flow from different sources and protect your batteries from draining when you’re not using the trailer. Think of it as a gatekeeper, selectively allowing or preventing power from reaching your trailer’s appliances and systems.Battery switches prevent your house batteries from being drained when your travel trailer is not connected to shore power or a generator.
So, you’re prepping for your next adventure in your travel trailer? First things first: understand your power! Knowing how to properly use your battery switch on travel trailer function is key to avoiding a dead battery and a ruined trip. Once you’ve got that sorted, it’s time to think about entertainment. A killer audiophile travel aetup can seriously elevate your road trip experience, transforming those long drives into mini-concerts.
Make sure you check your battery levels before blasting your tunes, though!
Without a switch, a small drain from things like clocks or carbon monoxide detectors could slowly deplete your batteries over time, leaving you with a dead battery when you next want to use your trailer. The switch acts as a simple on/off mechanism, completely isolating your batteries from any load when you’re not actively using the trailer. This is especially important for extended periods of storage.
So, you’re prepping for your awesome road trip? First things first: understand your travel trailer’s power. Check out this guide on the battery switch on travel trailer function to avoid any dead-battery surprises. Once you’ve got the power sorted, it’s time to think about entertainment. A killer audiophile travel setup will make those long drives fly by.
Seriously, good sound is a game-changer on the road!
Battery Switch Management of Multiple Power Sources
A battery switch plays a vital role in seamlessly integrating power from various sources, such as shore power (hookups at campsites), a generator, and solar panels. It allows you to choose which power source feeds your trailer’s systems, and in some cases, even combine power sources. For example, if you’re connected to shore power, you can use the switch to completely disconnect your batteries, relying solely on the campground electricity.
Conversely, when boondocking (off-grid camping), you can use the switch to select your house batteries as the primary power source, supplementing them with solar power if available. A more sophisticated switch might even allow you to charge your batteries from shore power while simultaneously powering your trailer’s appliances from the batteries. This flexibility makes it much easier to manage your power consumption and ensure you have enough power for your needs, regardless of your location.
Wiring and Installation of Battery Switches

Installing a battery switch in your travel trailer is a crucial step in managing your power system. Proper wiring ensures safe and reliable operation of your house batteries and prevents potential electrical hazards. This section details the typical wiring diagram, installation steps, and troubleshooting techniques for a common battery switch setup.
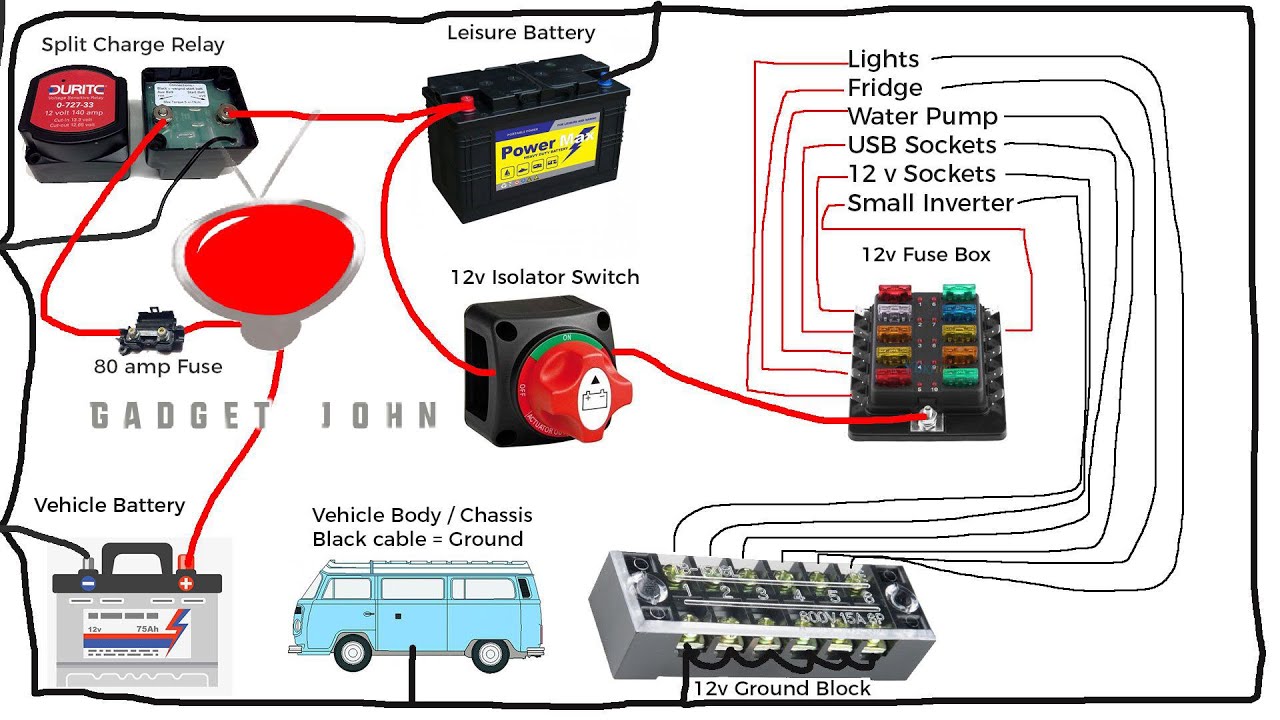
Typical Wiring Diagram for a Travel Trailer Battery Switch
The diagram depicts a typical setup with two batteries and a battery switch that isolates or connects them to the trailer’s electrical system. We’ll use a 1-2-Both switch configuration as an example. This allows you to select either battery 1, battery 2, or both for use. Accurate wiring is critical for safety and proper functioning. Improper wiring can lead to damage to your batteries or electrical system, or even create fire hazards.
Always use the correct wire gauge and appropriately sized fuses.Imagine a rectangle representing the battery switch. On the left side, you have two input terminals, labeled “Battery 1” and “Battery 2”. Each terminal connects to a positive (+) battery terminal via appropriately sized wiring (typically 4-gauge or 6-gauge wire, depending on battery capacity and length of wire run).
Each positive wire should have an inline fuse (typically a 150-amp ANL fuse) as close as possible to the battery positive terminal to protect against short circuits.On the right side of the switch rectangle, you have three output terminals. One is labeled “Load”, which connects to the positive terminal of your trailer’s electrical system (again, using appropriately sized wiring, such as 8-gauge or 10-gauge).
Another terminal is labeled “Ground”, which connects directly to the negative (-) terminal of your house batteries, using the same gauge wire as the positive wire. A third terminal, sometimes included, connects to a battery monitor or charging system.
Steps Involved in Installing a Battery Switch
Before beginning any electrical work, always disconnect the negative terminal from your batteries to prevent accidental short circuits. This is a critical safety precaution.
- Prepare the Location: Choose a location for the switch that is easily accessible, well-ventilated, and protected from the elements. Ensure you have adequate space for wiring connections.
- Mount the Switch: Securely mount the battery switch to a suitable surface using appropriate hardware.
- Connect the Batteries: Run appropriately sized and insulated wiring from the positive (+) terminal of each battery to the corresponding input terminals on the switch. Remember the inline fuses mentioned earlier. Securely connect the wires using appropriately sized ring terminals and crimp connectors.
- Connect the Load: Run appropriately sized and insulated wiring from the “Load” terminal of the switch to the positive (+) terminal of your trailer’s electrical system. Again, secure connections with appropriate ring terminals and crimp connectors.
- Connect the Ground: Connect the “Ground” terminal of the switch directly to the negative (-) terminal of your house batteries. Use the same gauge wire as your positive wire runs.
- Connect other systems (optional): If applicable, connect additional terminals such as those for battery monitors or charging systems.
- Test the Installation: Reconnect the negative battery terminals and test the switch to ensure it functions correctly. Turn the switch to each position (Battery 1, Battery 2, Both) and verify that the appropriate battery or batteries are supplying power to the trailer.
Troubleshooting a Faulty Battery Switch
If your battery switch isn’t working correctly, follow these steps to identify and fix the problem.
- Check the Fuses: Inspect all inline fuses for signs of blowing. Replace any blown fuses with fuses of the correct amperage rating. If a fuse blows repeatedly, there’s a short circuit somewhere in the system that needs attention.
- Inspect Wiring: Carefully examine all wiring connections for loose or corroded terminals. Tighten any loose connections and clean any corrosion. Look for any damaged or frayed wiring and replace as needed.
- Test the Switch Itself: If wiring and fuses are fine, the switch itself may be faulty. You can use a multimeter to test continuity between the input and output terminals in each switch position to determine if the switch is properly making connections.
- Verify Battery Connections: Ensure that the battery terminals are clean, tight, and properly connected to the wiring. Corrosion on the terminals can prevent proper current flow.
- Check for Power at the Switch: Use a multimeter to check for voltage at the input terminals of the switch to verify if the batteries are supplying power. If no voltage is present, there is a problem with the battery or the wiring leading to the switch.
Mastering your travel trailer’s battery switch is about more than just keeping your lights on; it’s about ensuring safe and reliable power for all your appliances. By understanding the function, maintenance, and potential hazards, you’ll be equipped to confidently manage your RV’s electrical system and enjoy worry-free adventures. Remember to always prioritize safety and consult a professional if you’re unsure about any aspect of the installation or troubleshooting process.
Quick FAQs
What size fuse should I use with my battery switch?
The fuse size depends on the amperage rating of your battery switch. Always use a fuse with an amperage rating slightly higher than the switch’s rating.
How often should I inspect my battery switch?
Inspect your battery switch at least once a year, or more frequently if you use your travel trailer extensively. Look for corrosion, loose connections, and any signs of damage.
Can I use a battery switch with different battery types (e.g., lead-acid and lithium)?
It’s generally not recommended. Different battery types have different voltage and charging requirements. Using an incompatible switch can damage your batteries.
What happens if my battery switch fails?
A failed battery switch could prevent you from powering your appliances, or worse, could lead to a short circuit or fire. It’s crucial to address any issues promptly.
